Exercise 1: Getting familiar with the Sun SPOT and the "Flashlight" application
Expected time: 20 minutes
Learning goals of this exercise
The goal of this exercise is to get you familiar with what a Sun SPOT device is. You will learn about the different parts visible and accessible on a Sun SPOT device including its sensors and actuators. You will also learn how to open a sample Sun SPOT Project, called "Flashlight", in NetBeans and build, deploy and run this application on your Sun SPOT. The application uses the resource API to turn on the LEDs when it detects the light sensor reading to be below a certain threshold.
How to Open a Sun SPOT
[NOTE: Sun SPOTs used at the JavaOne hands-on lab already have their lid removed.]
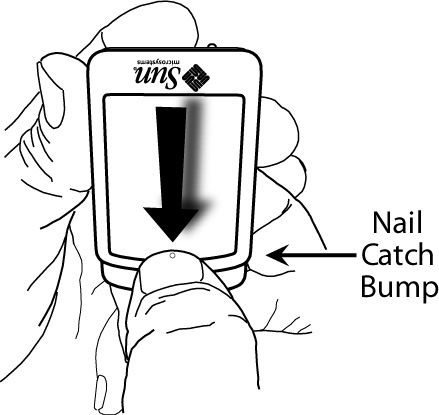
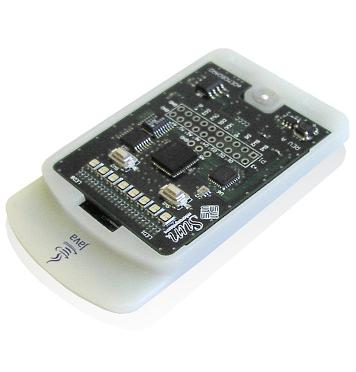
Pick up one of the Sun SPOTs. There is a lid
on the Sun SPOT, sometimes called a Sun roof. You will need to take the
lid off to get at some of the switches and LEDs. To open the lid, press
firmly on the lid, down and back, on the edge
of the lid near the small raised dot. You can think of that small-raised
dot as the fingernail-catching dot. The closer to the edge that you press,
the easier the lid will open. See the illustrations below:
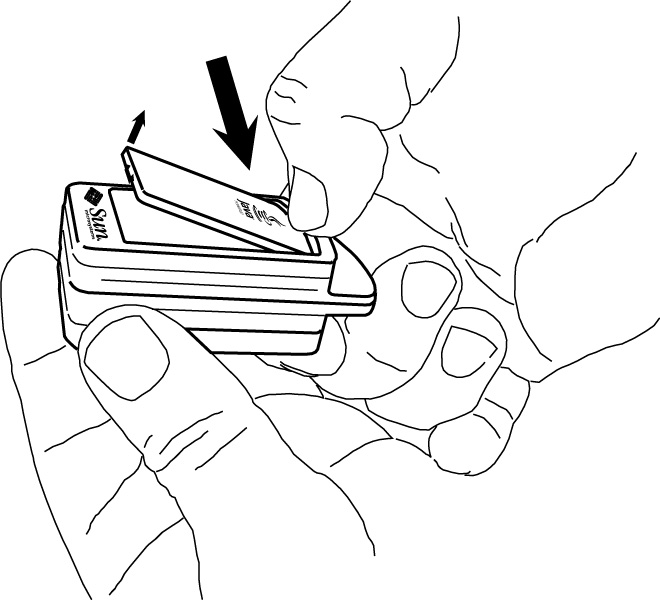
The opposite end of the lid will pop up. Grasp that opposite end to remove the Sun SPOT lid.
Now that you have opened it, you can see the LEDs and switches on the sensor board.
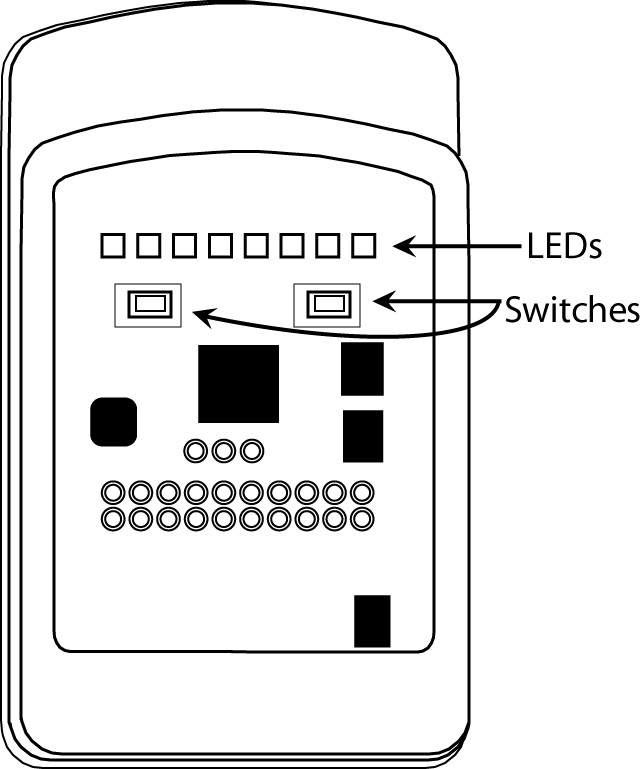
Both the switches ("SW1" on the left, "SW2" on the right) and all eight LEDs (numbered 0-7 from left to right) are under Java program control, so they will act differently, depending on the application that is running. That fin at the top of the SPOT is the radio fin housing the antenna for the wireless communication. On the back side of the fin is a printed label with the Id of the SPOT. You will need the last four hex-digits of your SPOT's Id for subsequent exercises.
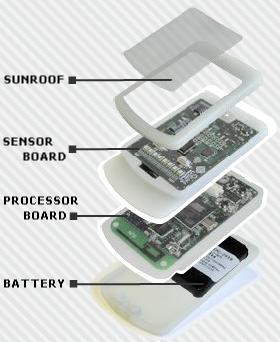
Anatomy of a Sun SPOT device
See Figure 2 for the complete anatomy of a Sun SPOT.
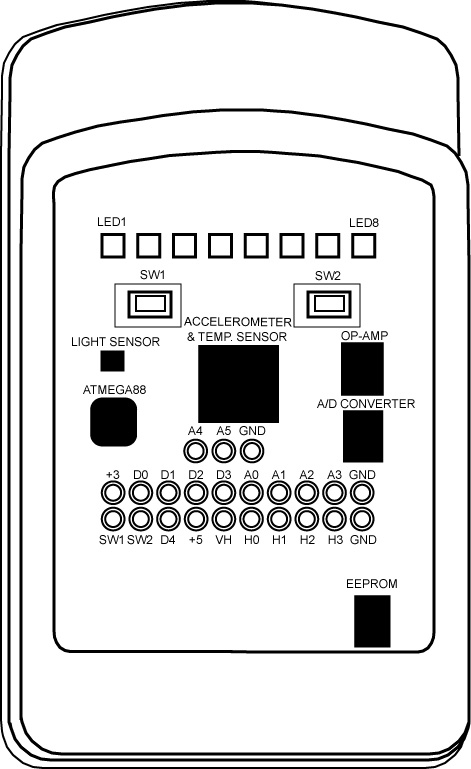
The sensor board has the following sensors and input/output components (see Figure 3)
- 3-axis accelerometer
- Light sensor
- Temperature sensor
- 8 tri-color LEDs (LED1-LED8)
- 2 input push buttons (SW1, SW2)
- 5 I/O TTL (D0-D4)
- 6 ADC I/O (A0-A5)
- 4 high current I/O = 15 V (H0-H3)
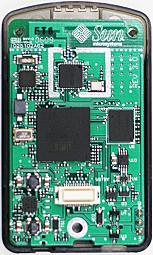
The Sun SPOT Main Board has the following components(see Figure 4)
- ARM-9 core with 512KB bytes of RAM and 4MB bytes of flash
- ChipCon 2420 radio
- Two LEDs
- Connector for stackable sensor boards
The back of the Sun SPOT is where you will find various components useful to the functioning of the Sun SPOT (see Figure 5)
Turning on and off a Sun SPOT device
If you tilt the SPOT so that the fin is away from you, you will see the Control Button.
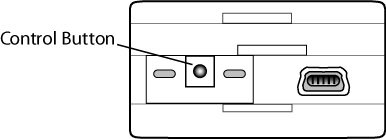
The Control Button is used to reset the SPOT, to put it to sleep, and to wake it up. If the SPOT is asleep, clicking once, briefly - just a tap - on the Control Button will wake the SPOT up. You may have to press hard, but you don't have to press long. If the SPOT is awake, clicking once on the Control Button will reset the SPOT and restart whatever program it was running. Pressing the Control Button down and holding it down for five seconds will put the SPOT to sleep. Let's try it out:
- To turn on the SPOT: Pick up one of the free-range SPOTs. Press the SPOT Control Button firmly and briefly, just a tap. You have just turned it on. You should see the LED to the right flicker green for about two seconds. That's the SPOT looking to see if it is connected to a host workstation. Some of the LEDs on the top should also light up because there is a demo on the SPOT that turns them on.
- To turn off the SPOT: Press the Control Button and hold it down for about five seconds. The LED to the left should flash red twice then go dark. You have just turned the SPOT off.
- To reset the SPOT: Turn on the SPOT so the preloaded demo is running again. To reset a running SPOT, just tap the Control Button again. The LEDs on the right will flicker green for about two seconds.
That's it! You have mastered the SPOT Control Button.
NOTE: If the Sun SPOT does not boot, if the LED to the right doesn't flicker when you tap the Control Button, the Sun SPOT probably needs to charge its battery. To charge a Sun SPOT battery, attach the SPOT, using the supplied USB cable, to the USB port on a working computer. The USB power will fully charge the Sun SPOT in approximately three hours.
Here is a little more detail on the LEDs that are on either side of the SPOT Control Button.
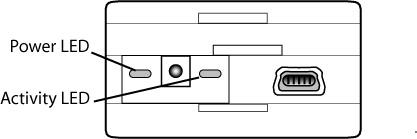
Those LEDs can be controlled by Java programs on the SPOT, but in ordinary circumstances, they are controlled by the operating environment on the SPOT. The LED on the left will tell you about the power status on the SPOT. Here are its most important signals:
| Power LED Signal | Meaning |
| Two red flashes | Powering down |
| Slowly alternate between bright and dim green | Charging from USB; CPU active |
| Slowly alternate between dim green and off | Charging from USB; CPU asleep |
| Steady dim green | Attached to USB, fully charged; CPU active |
| Slowly alternate between dim red and off. | Battery low. |
| One short green flash | Resetting, restarting program. |
| One bright green pulse, sharp on, soft off |
Powering up
|
The LED on the right is under application control. If that behavior is not changed, the system programs will use it to tell you about the communication status of the SPOT. Here are its most important signals.
| Activity LED Signal | Meaning |
| Rapidly flash green |
Searching for the host workstation on the USB connection
|
| Flash green | Packets being received from the host workstation |
| Flash red | Packets being sent to the host workstation. |
Building, Deploying and Running Sun SPOT Applications
One of the reasons we highly recommend NetBeans as an Integrated Development Environment (IDE) for Sun SPOT Application development is the ease of integration with Sun SPOT projects. In this section you will learn how to:
- Open a project in NetBeans
- Set it as the Main Project
- Build, deploy and run a Sun SPOT application
- Monitor the output of a running Sun SPOT Application
- Stop a running Sun SPOT Application from within the IDE.
These steps will be used in almost every exercise of the all the labs, so it is important to be familiar with how to perform them properly for each exercise.
Open a project in NetBeans:
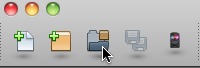
Opening a project in NetBeans is as simple as either selecting "File-->Open Project"
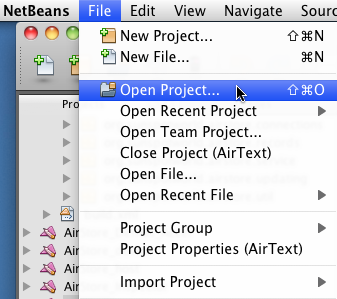
or clicking on the "Open Project" Button in the toolbar.
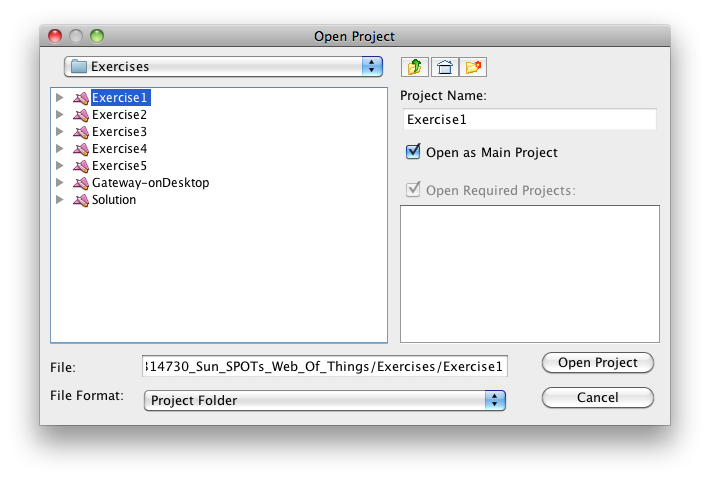
Setting the Main Project in NetBeans:
Once you have the Project opened in NetBeans, this lab expects that it will be set as the "Main Project" in order to facilitate easy deployment and running of the exercises. This can either be done as part of opening the Project itself by ticking the "Open as Main Project" box:
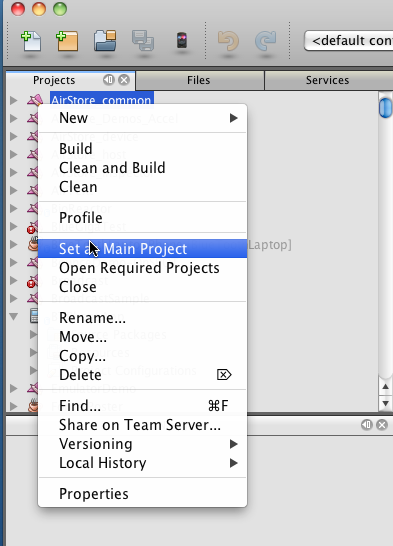
Or after the Project is opened by right-clicking on the project and selecting "Set as Main Project":
Browsing the source code
Double-click on the project name to view its contents and, under the folder named "src", navigate to the appropriate package name containing the file you wish to view and double click the file name. Here, we'll open up the file "Flashlight.java" in the org.sunsporworld package.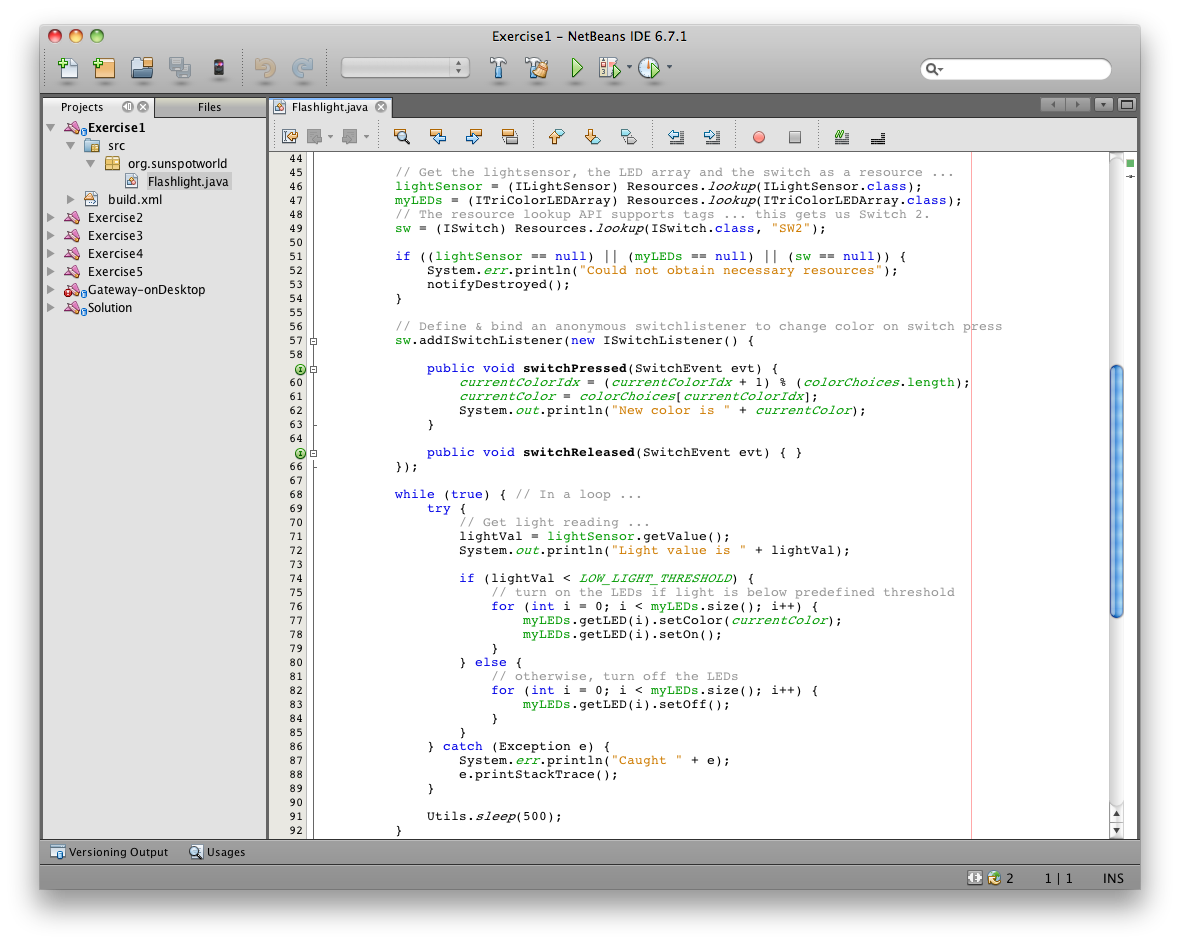
Build, deploy and run a Sun SPOT application
As part of the Project Tools included with the Sun SPOT SDK, we have integrated the required ant tasks to compile, deploy, and run a Sun SPOT application on a Sun SPOT device.
If your project is the Main Project, as it should be at this point, Deploying and running code on your Sun SPOT is as easy as connecting your SPOT to your computer using a USB cable, right-clicking on the project, and choosing "Run" from the context menu:
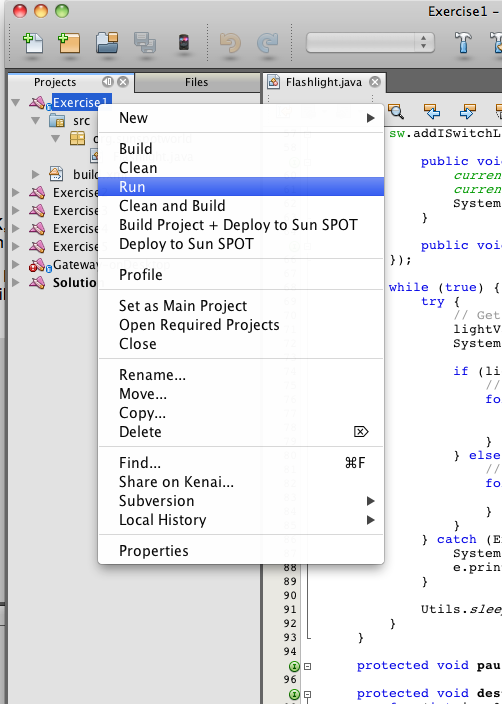
This will compile your project, deploy it to a connected Sun SPOT, and then begin execution of your Application.
Note: You should make sure that your Sun SPOT is not currently running an application before deploying/running a new application or the deploy/run will fail. See the section below on "Stopping a Running Sun SPOT Application".
Monitoring the output of a running Sun SPOT application:
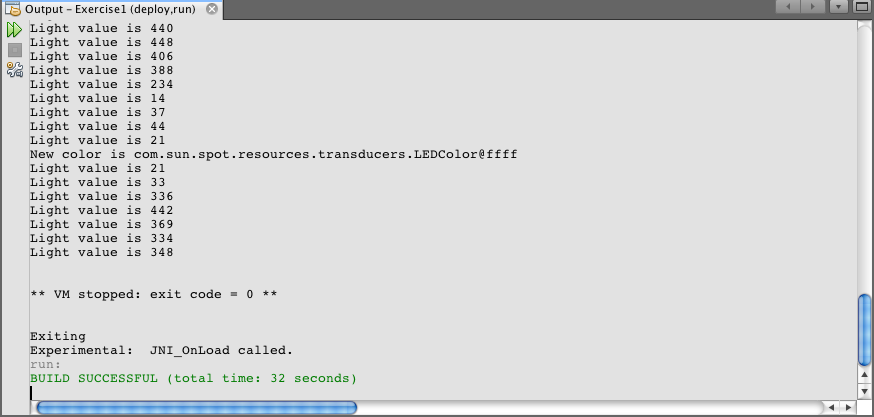
It will be important during the various lab exercises to be able to monitor the output from the Sun SPOT application. You will see in the console at the bottom of the NetBeans IDE window where all the output from the Build/Deploy/Run of your Sun SPOT application will be printed.
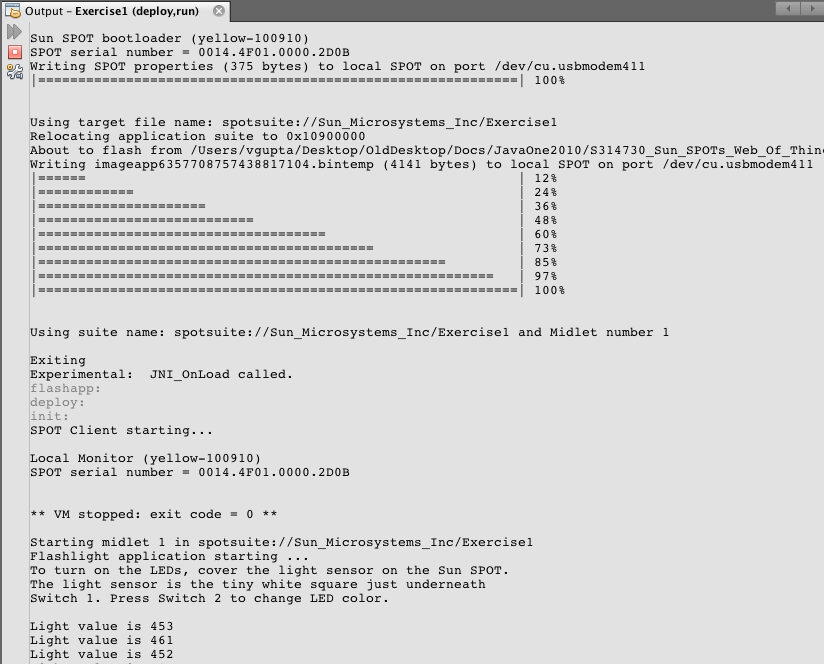
Notice that you see the output from the Ant tasks as well as any output from the actual running Sun SPOT application.
Stopping a Running Sun SPOT Application:
Before you can re-deploy or re-run a Sun SPOT Application, you must first make sure that the Sun SPOT is in a state where it can accept an incomming Deploy or Run command. The simplest way to do this is to ensure that you Stop the previously running application. There are two easy ways to do this.
- Press the 'Reset' button on the Sun SPOT device which will cause it to exit the currently running applicaiton, or
- Choose "Stop Build/Run" under the "Run" menu in NetBeans.
That will stop the currently running application and the Sun SPOT will be ready to accept an incoming application or command.
Troubleshooting
This section outlines different scenarios that may occur when attempting to issue commands that require communication with a Sun SPOT device. The commands that require communication with a Sun SPOT device are- ant deploy
- ant run
- ant host-run
The following scenarios are documented
- Please reset Spot if you don't get a prompt
- Waiting for reset
- Input your port selection
- Port not found
- Spotselector failed or was cancelled
Please reset Spot if you don't get
a prompt
- It is possible that you will receive ouput that ends in something
like
-run-debugclient:
     [java] Devel Library
     [java] =========================================
     [java] Native lib Version = RXTX-2.1-7pre17
     [java] Java lib Version   = RXTX-2.1-7pre17
     [java] Waiting for target to synchronise...
     [java] (please reset Spot if you don't get a prompt)
This indicates that the device is busy doing something else other than listening for commands from the SDK. The attention of the device must be grabbed in order for it to listen to new commands from the desktop.
- Press the Control button, located beside the USB connector. This will cause the device to reset, which will make it ready to listen to commands from the SDK.
Waiting for Reset
- It is possible that you will receive ouput that ends in
something
like
-run-debugclient:
This will happen if you have forgotten to plug in a Sun SPOT device, or that the Sun SPOT device was not properly recognized by operating system. Press the Control button to reset the Sun SPOT device.
[java] Devel Library
[java] =========================================
[java] Native lib Version = RXTX-2.1-7pre17
[java] Java lib Version = RXTX-2.1-7pre17
[java] Waiting for target to synchronise...
[java] (please reset SPOT if you don't get a prompt)
[java] [waiting for reset] <...>
[java] [waiting for reset] <...>
[java] [waiting for reset] <...>
[java] [waiting for reset] <...>
Input your port selection
- It is possible that you will receive ouput that ends in something
like
-main-find-spots:
     [java] If the selection does not respond to
     [java] input, cancel the build and set the
     [java] property spotselector.noninteractive=true


     [java] Sun SPOT devices found on multiple ports:
     [java]     1. /dev/term/0
     [java]     2. /dev/term/1
     [java] Input your port selection [1-2] or 'c' to cancel:
This will happen if you have more than one Sun SPOT device connected at the same time.
- It is strongly recommended that you ensure that only one Sun SPOT is connected at a time, in order to simplify your efforts while going through these exercises. Otherwise, you will be required to answer this question for every command requiring communication with a device, and you will have to learn how to identify which device you are wishing to actually communicate with.
- Unplug one of the devices, select c and re-issue the command that caused this message to appear.
Port not found
- It is possible that you will receive ouput that ends in something
like
BUILD FAILED
This will happen if you have forgotten to plug in a Sun SPOT device, or that the Sun SPOT device was not properly recognized by operating system.
<lab_root>\sdk\ant\find-spots.xml:150: >
No Sun SPOT devices found. Connect a device
and retry or, if you know that one is already
connected, specify its port using the "port"
property (either in a properties file or using
-Dport=XXX at the commandline). This will force
the build scripts to use that port.
Total time: 0 seconds
$ - Please plug a Sun SPOT device in and re-issue the command.
- If a Sun SPOT device is plugged in, the device may need not have been properly detected by the operating system. This requires that the device be turned off, then back on again.
- Turn off the Sun SPOT device, by pressing the Control button and hold it in
for at least 5 seconds.
This will cause the Power LED to flash red twice. - Turn Sun SPOT device back on by pressing the Control button again.
This will cause the Sun SPOT device to come back on and have its Activity LED to flash for a few seconds.
Spotselector failed or was
cancelled
- It is possible that you will receive ouput that ends in something
like
-run-spotselector:
This will happen if you plug in a Sun SPOT device which is configured as a basestation, and you are attempting to deploy to this device
[java] Please wait while connected Sun SPOTs are examined...
[java] No suitable SPOT is available
[java] Experimental: JNI_OnLoad called.
[java] Java Result: 255
-collect-spotselector-result:
-clean-up-spotselector-output-file:
-spotselector-fail:
BUILD FAILED
<lab_root>/../SunSPOT/sdk/ant/find-spots.xml:294: Spotselector failed or was cancelled - Please plug a Sun SPOT device in and re-issue the command.
- If a Sun SPOT device is plugged in, the device may need not have been properly detected by the operating system. This requires that the device be turned off, then back on again.
- Turn off the Sun SPOT device, by pressing the Control button and hold it in
for at least 5 seconds.
This will cause the Power LED to flash red twice. - Turn Sun SPOT device back on by pressing the Control button again.
This will cause the Sun SPOT device to come back on and have its Activity LED to flash for a few seconds.
Summary:
In this exercise, you became familiar with the basic layout and functioning of a Sun SPOT device and a sample application that accesses the light sensor and the LEDs on a Sun SPOT.