First, look at the iRobotCreateDemo Java code
To view the demo's code, we will use the NetBeans tool that was installed when you downloaded the SDK. NetBeans is an Integrated Development Environment (IDE) and makes working with Java code easier. NetBeans is not required, but it will make things very convenient.
To start NetBeans, look in your Program Files, or look for a shortcut icon on your desktop. On a Mac it is in your Applications folder.
Once NetBeans is started, we want to open the iRobotCreateDemo code. The folder containing the code is recognized by NetBeans as being a “NetBeans project.” Go to the NetBeans File menu and select File > Open Project ...
Use the resulting file chooser to find the iRobotCreateDemo folder inside the SunSPOT/sdk directory. On a Windows computer the folder is usually found in C:/Program Files/Sun/SunSPOT/sdk/Demos.
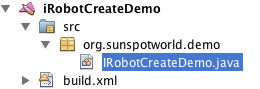
You will find the java source file inside the iRobotCreateDemo project. Click on the iRobotCreateDemo in the project list to look inside. Navigate through the src folder, then the org.sunspotworld.demo package icon into the iRobotCreateDemo.java file. Double click on this source file to see the code. |
 |
Look for the method
protected void startApp()
The startApp() method calls center() which in turn calls centerLine() twice. One time will find the center horizontally, the other vertically. That is why there is a turn(90) between the two calls to centerLine(). When you run the program you can see the emulated robot carry out this strategy.
Modify the demo
The sample code provided defines another method, wall(), that uses the Create's wall sensor to allow the Create to follow a wall as it moves. Find the demo's startApp() method, comment out the call to center(), and uncomment the call to wall():
// center();
wall();
Save the file, and using the popup menu on the SPOT View Sun SPOT, deploy the modified code by selecting Deploy Midlet Bundle.... Then position the emulated Create robot near the lower left corner, with the robot pointing to the right. Now you are ready to run the modified demo, so on the SPOT View icon, pop up and select Run Midlet > IRobotCreateDemo. The Create robot will move to the right trying to stay close to the wall. You can see it make a few subtle adjustments in heading before it stops when hitting the right edge.
You may be wondering about the red X and O marks in the room. They represent infrared beacons that the Create robot can sense, using the method getInfraredByte(). When writing a program to run the maze, this allows you to sense when you have gotten to the finish. See the beaconInfo() method in the sample code for details.
Try your own code
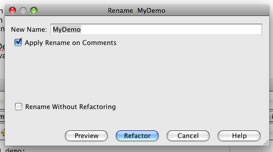
To try your own code, copy the iRobotCreateDemo and make a new NetBeans project by modifying it. In NetBeans, select the iRobotCreateDemo project and right-click on it to get the pop-up menu. Select copy... and choose your own name such as “MyDemo.”
Inside the MyDemo project, find your source file, but click on the file name to rename it to MyDemo.java. A confirmation dialog will appear, and select “Refactor” to accept your new name.
Now look in your MyDemo.java file. Delete everything below the line
private IRobotCreate create = Create.makeIRobotCreate();
and above the line
public void bumpEvent(boolean bumpRight, boolean bumpLeft, boolean oldRight, boolean oldLeft) {
Now look inside the method startApp(). Delete the code in the center so that your method now looks like this

In the center of this method you can put whatever robot commands you wish.
To find all the possibilites, and what they do, look at the “javadoc” file with your browser. This javadoc was installed in the Sun SPOT SDK when you downloaded it. Use your browser to view this file:
./SunSPOT/sdk/Demos/iRobotCreateDemo/CreateAPIjavadoc/index.html
In the IRobotCreate Interface, you will find a list of all the commands and queries you can send to an instance of the robot. For example, your code might include
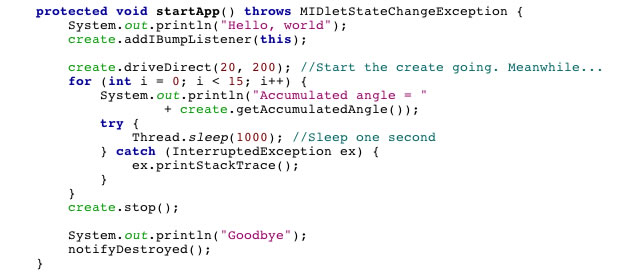
create.driveDirect(20, 200);
Which will make the left wheel go faster than the right, so it turns in a circle. The query
create.getAccumulatedAngle();
will get an integer indicating the total number of degrees turned so far.
Just as an example, the following program will run for awhile printing out the accumulated angle as the robot makes its circle:
Be sure to save your code in NetBeans, then go to the emulated Sun SPOT in SPOT View. Just as with the demo, in SPOT View you must
1. select Deploy Midlet Bundle... navigating to select your project's build.xml file with the file chooser, then
2. select Run MIDlet > MyDemo in order to run your program.
Have fun!